If you are looking to setup personal VPN server to reclaim your online privacy, you have come to the right place. In an era where commercial VPN providers are constantly getting hacked or caught selling user data, taking control of your own infrastructure is the only logical step.
Why did you buy an anonymous VPS from SarvHost? Probably because you value freedom. So why route your traffic through a third-party VPN service? When you setup personal VPN access on your own hardware, you become the administrator. No logs, no throttling, and no shared IP addresses.
In this guide, we are going to ditch the slow, outdated OpenVPN protocols. Instead, we will use WireGuard. It is modern, lean, and incredibly fast. By the end of this 5-minute tutorial, you will have a military-grade encrypted tunnel running on your Ubuntu VPS.
Why Choose WireGuard Over OpenVPN?
Before we start the installation, it is important to understand why we recommend WireGuard for your private server.
- Speed: OpenVPN lives in the “user space” of the OS, which makes it slower. WireGuard runs inside the Linux Kernel, making it blazing fast. You won’t even notice it’s on.
- Codebase: OpenVPN has hundreds of thousands of lines of code (hard to audit). WireGuard has less than 4,000. Fewer lines mean fewer bugs and security holes.
- Roaming: WireGuard handles network changes (like switching from Wi-Fi to 4G) instantly without dropping the connection.
Prerequisites
To follow this guide, you will need:
- A KVM VPS running Ubuntu 22.04 or 24.04 (Available at SarvHost).
- Root access (SSH enabled).
- About 5 minutes of your time.
Note: If you followed our previous guide on securing your VPS, ensure your firewall allows UDP traffic. The script we use will handle most of this automatically.
Step 1: Update and Prepare Your Server
Always start with a fresh system. Log into your server via SSH. If you want to setup personal VPN correctly, you need to ensure your dependencies are up to date.
Run these commands to update the package list and install curl:
apt update && apt upgrade -y
apt install curl -y
Step 2: Run the Automated Installer Script
We are not going to manually edit complex config files today. That is where mistakes happen. Instead, we will use the widely respected angristan/wireguard-install script from GitHub. It automates the entire process of setting up keys, interfaces, and routing tables.
Copy and paste this single command into your terminal and hit Enter:
curl -O https://raw.githubusercontent.com/angristan/wireguard-install/master/wireguard-install.sh && chmod +x wireguard-install.sh && ./wireguard-install.sh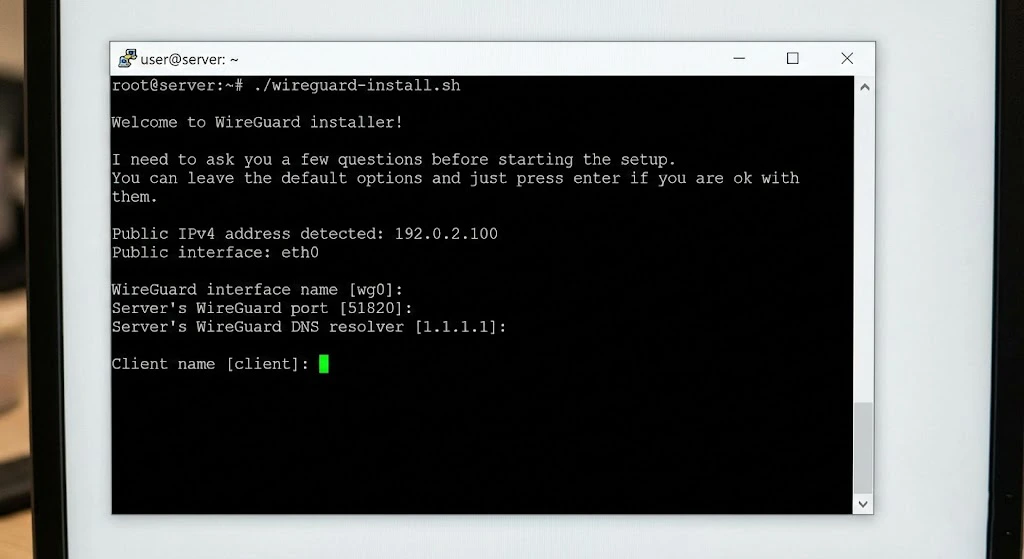
Step 3: Configure the Installation (Just Press Enter!)
The script will launch an interactive wizard in your terminal. It might look technical, but it is actually very smart at guessing the best settings for your specific server environment.
You will be asked a series of questions:
- IPv4 or IPv6? (It detects your IP automatically).
- Public Interface? (Usually
eth0). - WireGuard Port? (Default is 51820).
- DNS Resolvers? (It suggests AdGuard or Google).
Pro Tip: For 99% of users, the default answers are perfect. Just keep pressing ENTER until it asks for a “Client Name”.
When prompted for a Client Name, type something descriptive like MyiPhone or HomeLaptop and press Enter.
The script will now install WireGuard, generate your private/public encryption keys, and configure the firewall rules.
Step 4: Connect Your Device (QR Code Method)
This is the magic moment. Once the installation finishes, the script will generate a configuration file. But you don’t need to download it manually.
The script will display a large QR Code directly inside your terminal window.
How to connect your phone:
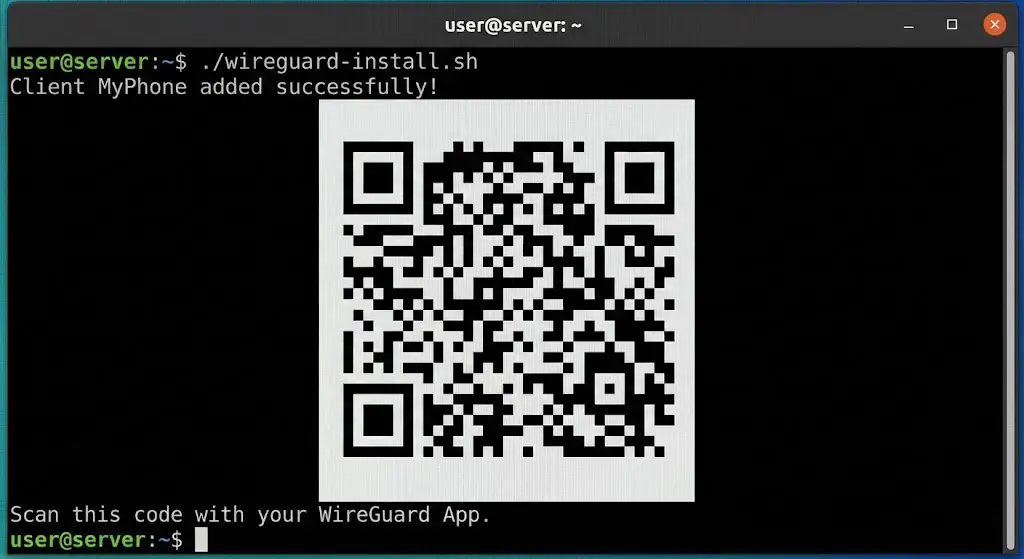
- Download the official WireGuard App from the App Store (iOS) or Google Play (Android).
- Open the app and tap the “+” button.
- Select “Scan from QR code”.
- Point your camera at your computer screen (terminal).
- Name the tunnel (e.g., “SarvHost VPN”) and toggle the switch to ON.
Congratulations! Your traffic is now encrypted and exiting through your VPS in Germany or the Netherlands.
Troubleshooting Common Issues
Sometimes things don’t go 100% smoothly. Here are common fixes if you can’t connect:
1. Handshake Failed?
If the app shows the connection is active but you have no internet, it usually means the “Handshake” failed. Check your firewall. Ensure UDP port 51820 is open:
ufw allow 51820/udp2. Adding a Second Device?
Do not scan the same QR code for two devices at the same time. It will cause conflicts. To add a second device (like your laptop), simply run the script again:
./wireguard-install.shSelect option 1) Add a new client, give it a new name, and a new QR code will appear.
Final Thoughts: Privacy is a Choice
Learning to setup personal VPN infrastructure is a superpower in the digital age. You are no longer dependent on shady “free” VPN apps that sell your browsing history.
With SarvHost, you get the raw power and anonymity needed to run these services. Our “No KYC” policy ensures that even we don’t know who owns the VPN server.
Ready to build your tunnel? Grab a high-speed NVMe VPS today.
🚀 Get Your Private VPN VPS ($5.99)